DNS leaks exposing your real IP and browsing history? Detect and fix them fast
You may think you've hidden yourself well online, but after a quick check, your real IP address and recent browsing activity are still clearly exposed. The culprit behind this is often DNS leakage.
What's even worse is that even if you change your IP address, as long as DNS leaks exist, your actual browsing records can still be seen by certain third parties.
In this guide, we'll walk you through a complete DNS leak testing process and show you several reliable ways to fix DNS leaks. Every step is explained clearly and practically.

1. What Is a DNS Leak and Why Is It Dangerous?
DNS is the system that translates domain names into the underlying IP addresses needed to access websites. If you're not using any privacy tools, these DNS requests go directly through your Internet Service Provider (ISP), which can easily see your browsing activity.
Many people assume that using a proxy or privacy tool makes them invisible online. In reality, your device may still bypass the encrypted tunnel and send DNS requests directly to your ISP's default DNS server. This situation is known as a DNS leak.
Once a DNS leak occurs, your real IP address and browsing history—including the domains and websites you visit—can be exposed to your ISP or other network observers, creating a serious privacy vulnerability.
2. Quick Start: How to Perform a DNS Leak Test?
Now that you understand what DNS leakage is, it's time to check whether your device is affected. We recommend ToDetect because of its user-friendly interface.
• Step 1: If you normally use tools that protect or mask your IP address, launch and connect them on your computer or mobile device.
• Step 2: Open your browser in Incognito/Private mode and clear any previous cache and browsing data to ensure a clean testing environment.
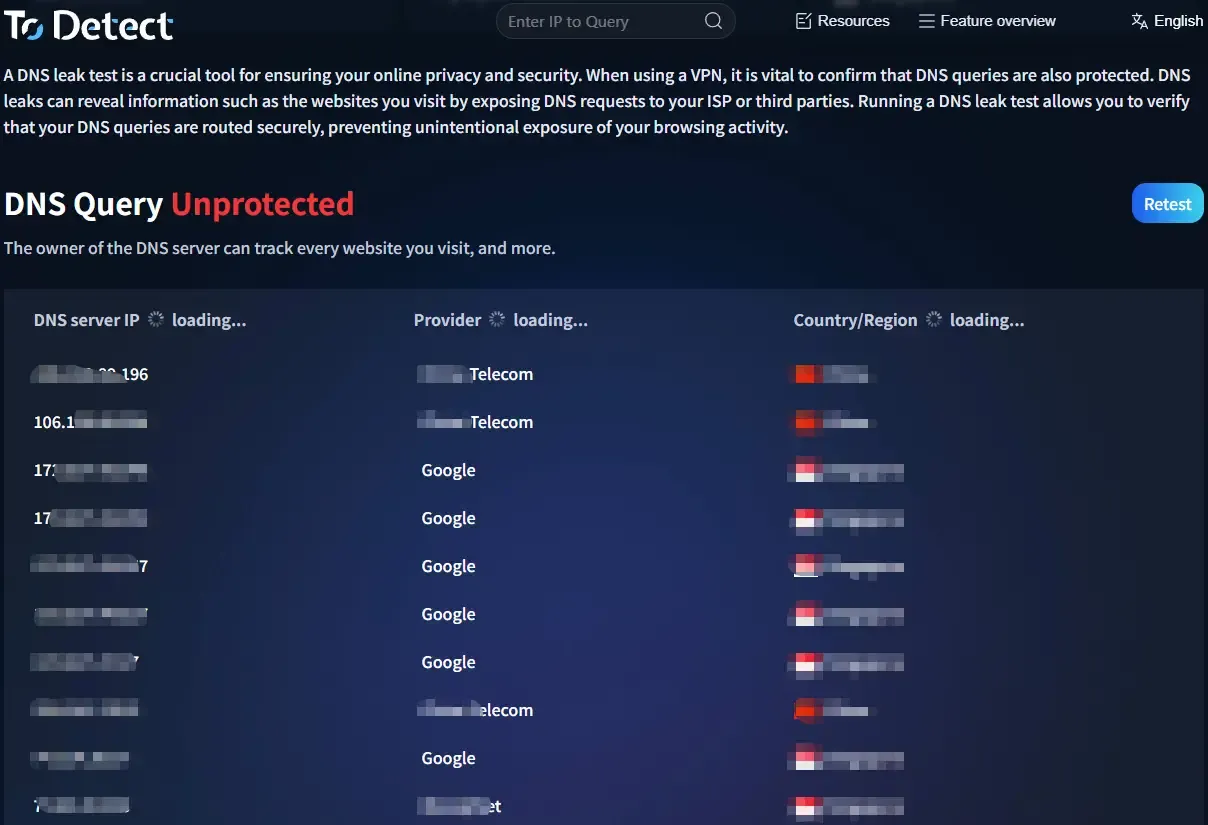
• Step 3: Visit the ToDetect website. On the homepage, locate the "Network Test" section and select the "DNS Leak Test" feature. No registration or login is required—simply click "Start Test."
• Step 4: The page will return a detailed report showing which DNS servers your device is currently using, where those servers are located, and which provider operates them.
If the DNS servers shown match the provider used by your privacy tool, your setup is working correctly. However, if the results reveal DNS servers belonging to your local ISP, then your DNS requests are leaking outside your protected connection.
Many users have the following questions:
• Can Incognito Mode prevent DNS leaks? No. Incognito Mode only prevents local browsing history from being stored. It does not affect how DNS requests are transmitted.
• How can I verify whether my privacy tool is reliable? Simply run a DNS leak test after connecting and check which DNS provider appears in the results.
3. What to Do If You Discover a DNS Leak: A Complete Fix Guide
Method 1: Change Your System DNS Servers (Best for Beginners)
• Windows: Right-click the network icon in the system tray → Open "Network & Internet Settings" → Select "Change Adapter Options" → Right-click your active connection (Wi-Fi or Ethernet) → Choose "Properties" → Double-click "Internet Protocol Version 4 (TCP/IPv4)" → Select "Use the following DNS server addresses" and enter your preferred public DNS servers.
Note: After making changes, open Command Prompt and run "ipconfig /flushdns" to clear the DNS cache and apply the settings immediately.
• macOS: Open "System Settings" → "Network" → Select Wi-Fi or Ethernet → "Details" → "DNS" → Change from automatic to manual DNS and enter your preferred DNS addresses. Then run "sudo killall -HUP mDNSResponder" in Terminal to refresh DNS services.
• Mobile Devices (iOS/Android): Open Wi-Fi settings → Tap the connected network → Find the DNS configuration option → Select "Manual" → Remove existing DNS entries and add new public DNS servers.
Method 2: Upgrade Your Network with Reliable Public DNS Servers
Many users still rely on DNS servers automatically assigned by their ISP. These servers may be less stable and can sometimes log user activity or be subject to DNS hijacking.
• Alibaba DNS: Primary 223.5.5.5 | Secondary 223.6.6.6
• Tencent DNSPod: Primary 119.29.29.29 | Secondary 182.254.116.116
• 114DNS: Pure Version 114.114.114.114 | Secure Version 114.114.115.115
• CNNIC DNS: 1.2.4.8 | Secondary 210.2.4.8
International privacy-focused DNS providers:
• Cloudflare DNS: 1.1.1.1 | Secondary 1.0.0.1 (Supports DNS over HTTPS)
• IBM Quad9: 9.9.9.9 (Blocks many malicious domains)
• OpenDNS: 208.67.222.222 | Secondary 208.67.220.220
Method 3: Enable Encrypted DNS for Additional Protection
Chrome: Enter chrome://settings/security in the address bar. Scroll down to "Advanced" and enable "Use Secure DNS." Choose a custom provider and enter the HTTPS address of your preferred encrypted DNS service.
Firefox: Open "Settings" → "Privacy & Security" → Scroll down to "Enable DNS over HTTPS." Select Enhanced Protection or configure a custom provider. Advanced users can set "network.trr.mode" to "3" in about:config to force all DNS requests through DoH.
Windows 11: Open "Settings" → "Network & Internet" → Select your current connection → "DNS Server Assignment" → "Edit" → Choose Manual → Enter DNS addresses and select encrypted options such as "Encrypted Only (HTTPS)" or "Encrypted Only (TLS)."
Method 4: Secure Your Router and Firewall
Even if your computer or phone is configured correctly, DNS leaks can still occur if your router continues to use ISP-assigned DNS servers.
Log in to your router's admin panel (commonly 192.168.1.1 or 192.168.0.1) and manually replace the default DNS servers with trusted public DNS addresses.
Also check whether features such as "DNS Hijacking" or "Forced DNS" are enabled, as they can override device-level DNS settings. If you notice suspicious changes, update your router firmware and change the administrator password immediately.
This step is particularly important. Recent security advisories have warned that compromised home routers with modified DNS settings can redirect users to phishing websites and lead to serious account theft risks.
4. DNS Leak Test FAQ
Q1: I changed my DNS settings. Why does the test still show my ISP's DNS server?
A: In most cases, your router is overriding your settings. Update the DNS configuration on the router itself, reboot it, and run the test again.
Q2: Why can websites still determine my city even after enabling encrypted DNS?
A: Encrypted DNS only protects DNS queries. It does not prevent WebRTC leaks or browser fingerprinting from exposing your actual IP address. Run a comprehensive privacy test and consider disabling WebRTC.
Q3: Can DNS leaks happen when using 4G or 5G mobile networks?
A: Yes, and they are quite common. Mobile carriers typically use their own DNS servers by default. If a DNS leak test shows your carrier's DNS, consider configuring public DNS servers or using an app that supports system-wide DoH or DoT.
Final Thoughts
We've covered how to detect and fix DNS leaks in detail. When it comes to online privacy, the biggest risk isn't lacking technical knowledge—it's not knowing the problem exists in the first place.
Spending just ten minutes running a DNS leak test, configuring secure DNS servers, and enabling encrypted DNS protocols can significantly improve your privacy and help protect your real IP address and browsing activity.
Whenever you switch networks, make it a habit to run a quick DNS leak test. Consistent checks are one of the easiest ways to keep your online privacy under your own control.