A Simple Guide to DNS Leak Testing (with Detailed Pictures) – Follow These Easy Steps
Many people, when first getting into online privacy, circumvention tools, or proxy services, are quickly confused by one term — DNS leaks.
The tool is clearly connected, the IP address looks different, and you think you’re well hidden — but in reality, your DNS requests may have already “betrayed” you.
Today, we’ll share a set of DNS leak testing methods that even complete beginners can follow. No complex concepts, no complicated configurations — just read and test it yourself.

1. What Is a DNS Leak? Explained in Plain English
Simply put: a DNS leak means that while you’re using a proxy or VPN, your domain name requests are quietly going through your local network.
In other words:
The website content you visit may go through the proxy, but the step of “which website you’re trying to access” is still visible to your local DNS or ISP.
This has a major impact on privacy and anonymity, which is why DNS leak detection is often overlooked but extremely important.
2. Is DNS Leak Testing Necessary? Who Should Test?
If any of the following apply to you, you should definitely run a test:
• Using IP tools, proxies, or VPN services
• Having requirements for privacy or anonymity
• Having modified DNS settings or used public DNS
• Frequently accessing foreign websites or overseas services
Simply put, if you don’t want to be “anonymous on the surface but exposed underneath,” then DNS leak testing is a must.
3. Beginner-Friendly DNS Leak Test (Step-by-Step)
Step 1: Clean Your Browser Environment (Very Important)
Before starting the test, it’s recommended that you:
• Disable unnecessary browser extensions
• Or use incognito/private mode
• If possible, use a clean or fresh browser
Later, we’ll also run a browser fingerprint test. The cleaner the environment, the more accurate the results.
Step 2: Visit a DNS Leak Testing Website
Open your browser and go directly to a DNS testing page:
Once the page finishes loading, you’ll usually see:
• Your current IP address
• A list of DNS servers
• The country and ISP associated with the DNS
No need to click anything — just wait for the page to fully load.
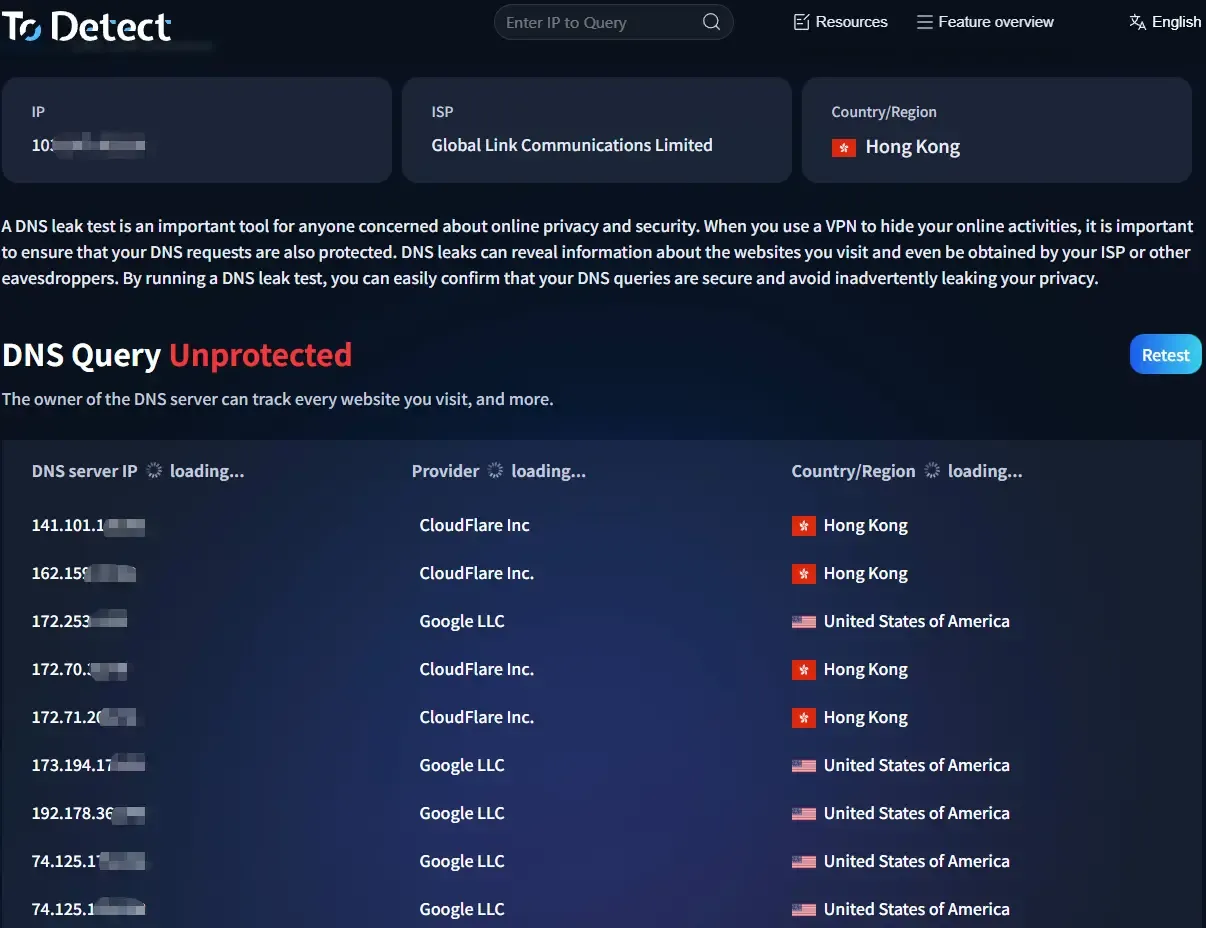
Step 3: How to Read DNS Leak Test Results (Key Point)
Focus on the following areas:
1️⃣ DNS Server Country
• If you’re using an overseas node but the DNS still shows China
• You can be almost certain there is a DNS leak
2️⃣ DNS Provider
• If local ISPs (such as China Telecom or China Unicom) appear
• Or your real network environment is shown 👉 higher risk
3️⃣ Number of DNS Servers
• Normally, the number should not be too high
• If you see many mixed entries, it’s likely a configuration issue
This step is essentially the core of DNS leak detection.
4. Go One Step Further: Combine with Browser Fingerprint Detection
Testing DNS alone isn’t enough. Many platforms now also identify users through browser fingerprints.
This is where the ToDetect Fingerprint Checker comes in:
• Check browser fingerprint uniqueness
• Evaluate anonymity and identifiability
• Help verify consistency between DNS, IP, and environment
After completing the DNS leak test, you can open the ToDetect fingerprint tool to check:
• Whether the DNS region matches the IP
• Whether the browser environment looks “too real”
• Whether there are obvious fingerprint anomalies
By combining these two checks, you can generally determine whether your current environment is safe.
5. Common Causes of DNS Leaks (Many People Get Caught)
• System default DNS not modified
• VPN does not support DNS leak protection
• Browser DoH enabled but misconfigured
• Using unreliable proxy tools
• Conflicts from multiple proxies or network adapters
If you detect issues during a DNS leak test, the cause can usually be found here.
6. DNS Leak Detection — How Often Should You Test?
• After switching tools or nodes: test once
• After major system or browser updates: test once
• High-privacy scenarios: quick test before each use
The entire process takes only 1–2 minutes — really not a hassle.
Final Thoughts
With fingerprinting becoming more common, checking IP alone is no longer enough.
Only by checking DNS, IP, and browser fingerprint together can you truly understand your exposure.
In critical scenarios, spending 1–2 minutes on a DNS leak test, combined with a quick look at your environment via ToDetect’s browser fingerprint tool, can help you avoid many “invisible risks.”
If you find this content helpful, consider bookmarking it. The next time you change tools or environments, revisit it for a quick check — it’s far better than discovering issues after the fact.
 AD
AD