What is a DNS leak? DNS leak detection methods and step-by-step fixing guide
Many people believe that once they connect to a proxy or VPN, they can browse the internet completely anonymously and securely. In reality, things are often not that simple. One of the most overlooked privacy risks is DNS leakage.
Whether you're browsing the web daily, running a cross-border business, or simply concerned about online privacy, understanding DNS leak testing and DNS leak prevention is essential.
In this article, we'll explain how DNS leaks occur, how to detect them yourself, and most importantly, how to fix DNS leaks so that you can truly stay connected while protecting your privacy.

1. What Is DNS Leak?
DNS acts like the internet's phone book. When you're using a proxy or VPN, DNS requests should also be routed through the encrypted tunnel. However, if a DNS leak occurs, those requests bypass the proxy and are sent directly to your local Internet Service Provider (ISP).
As a result, your ISP may still see which websites you're visiting. While your traffic content remains encrypted, your browsing activity can still be exposed, creating a significant privacy risk.
2. Common Causes of DNS Leaks
DNS leaks are more common than many people realize. Typical causes include incomplete proxy configurations where traffic is tunneled but DNS requests are not, or situations where the system's default DNS settings take priority over the VPN or proxy.
Other common reasons include public Wi-Fi networks automatically redirecting DNS requests, browsers or operating systems enabling "smart DNS" features, or IPv6 traffic bypassing the VPN. Windows and Android devices are particularly prone to these issues due to their default settings.
3. DNS Leak Test Methods (Step-by-Step Guide)
Method 1: Online DNS Leak Testing Tools
Visit a DNS leak testing website and run tests both before and after connecting to your proxy or VPN. If the reported DNS servers belong to your ISP rather than your VPN provider, a DNS leak is likely occurring.
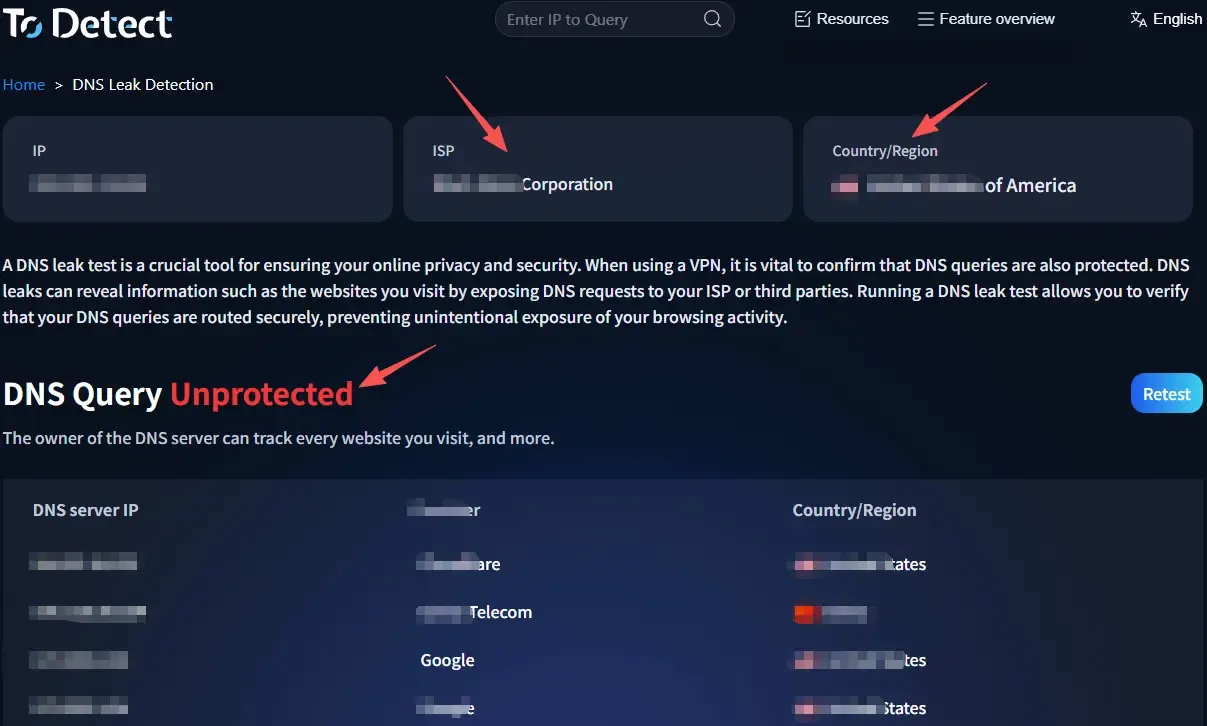
Method 2: Use the ToDetect Testing Platform
If you want more detailed analysis, ToDetect provides more than just DNS leak testing. It also offers:
• DNS resolution path analysis
• IP geolocation identification
• Network risk assessment
• Browser fingerprint detection
Browser fingerprint detection is especially useful because it can reveal whether your device is exposing information such as screen resolution, installed fonts, time zone settings, and other identifying characteristics.
Method 3: Command-Line Testing (Advanced)
Windows users can use nslookup to examine DNS resolution paths and ipconfig /all to view current DNS servers. If the DNS server shown is not provided by your VPN, you should investigate further for possible DNS leaks.
4. How to Fix DNS Leaks (Practical Steps)
1. Enable DNS Leak Protection in Your VPN or Proxy
This is the most important step and one that many users overlook. Most reputable VPNs and proxy services include a DNS Leak Protection feature, but it may be disabled by default. Once enabled, all DNS requests are forced through the encrypted tunnel instead of being sent to local DNS servers.
Look for settings such as "DNS Protection," "DNS Leak Protection," or "Use VPN DNS" and enable them. Afterward, reconnect your VPN and run another DNS leak test to verify that the protection is working correctly.
2. Manually Change Your DNS Servers
If your VPN's built-in DNS service is unstable or if you want an extra layer of protection, consider manually configuring your DNS servers. Popular options include Cloudflare DNS (1.1.1.1) and Google DNS (8.8.8.8), both of which are reliable and resistant to DNS hijacking.
After changing DNS settings, clear your DNS cache as well. Windows users can run ipconfig /flushdns. This helps ensure that old DNS records do not interfere with your new configuration.
3. Disable IPv6 to Prevent Bypass Leaks
Many DNS leak issues are not caused by a malfunctioning VPN but by IPv6 traffic bypassing the protected tunnel. Some VPNs only secure IPv4 traffic, leaving IPv6 requests exposed.
To solve this, disable IPv6 in your network settings or enable "IPv6 Leak Protection" within your VPN software. After making the change, run another DNS leak test. This often resolves a large percentage of unexplained DNS leak issues.
4. Enable Secure DNS (DoH) in Your Browser
Modern browsers such as Chrome and Edge support DNS over HTTPS (DoH), which encrypts DNS requests and prevents local networks from directly monitoring them.
You can enable Secure DNS in your browser settings and select a trusted provider such as Cloudflare. While this is not a complete replacement for a VPN, it significantly reduces browser-level DNS exposure and serves as an excellent additional layer of protection.
5. Switch to a More Reliable VPN Protocol
The VPN protocol you use can also affect DNS security. Older protocols may suffer from routing or split-tunneling issues. Modern protocols such as WireGuard and OpenVPN (UDP) generally provide better DNS handling and stronger protection against leaks.
If DNS leaks continue to occur, try switching protocols and running another test. In many cases, the issue stems from protocol compatibility rather than your device or network configuration.
5. DNS Leak Test FAQ
1. Does a DNS Leak Affect VPN Encryption?
Yes, but not by breaking the encryption itself. Instead, it exposes your browsing activity. The content of your traffic remains encrypted, but the websites you visit may still be visible to your ISP.
2. If My DNS Leak Test Shows No Issues, Am I Completely Safe?
Not necessarily. A test only reflects your current connection. DNS leaks can reappear when switching networks, reconnecting your VPN, or changing devices. It's a good practice to perform DNS leak tests regularly.
3. Is It Worth Using ToDetect for Browser Fingerprint and DNS Leak Testing?
Absolutely. DNS leak testing helps determine whether your network layer is exposing information, while browser fingerprint testing reveals whether your device can be uniquely identified. Together, they provide a much more complete picture of your online privacy.
Conclusion
DNS leaks are not particularly complex, but they are one of the most common privacy vulnerabilities caused by default settings that many users never review.
Fortunately, fixing DNS leaks is usually straightforward. Combined with browser fingerprint analysis tools such as ToDetect, you can perform a comprehensive privacy assessment of your entire online environment and resolve most exposure risks.
Online privacy is never a one-time setup. It requires ongoing monitoring and optimization. Performing regular DNS leak tests can be far more valuable than dealing with privacy breaches after they occur.