DNS Leaks Driving You Crazy? Here's How to Go From Leaky to Leak‑Free
Many people are completely confused the first time they encounter a DNS leak: the proxy is clearly on and the IP has changed, yet a DNS leak test still reveals their real information.
In fact, the problem isn’t with the tools at all—it’s in the details. Especially with DNS, even a slight misconfiguration can ruin everything.
Today, we’ve summarized the common pitfalls most people run into and put together a reliable solution to help you go from failure to success—easily fixing stubborn DNS leaks.

1. What Is a DNS Leak? Why Is It So Critical?
DNS is the service that translates a “domain name” into an “IP address.” If your DNS requests don’t go through your proxy but instead use your local network, a DNS leak occurs.
This can lead to several issues: exposing your real geographic location and being flagged as suspicious traffic by websites, which may trigger risk controls or account bans (especially in cross-border operations).
Many people think “changing the IP means you’re safe,” but DNS is often the most hidden vulnerability.
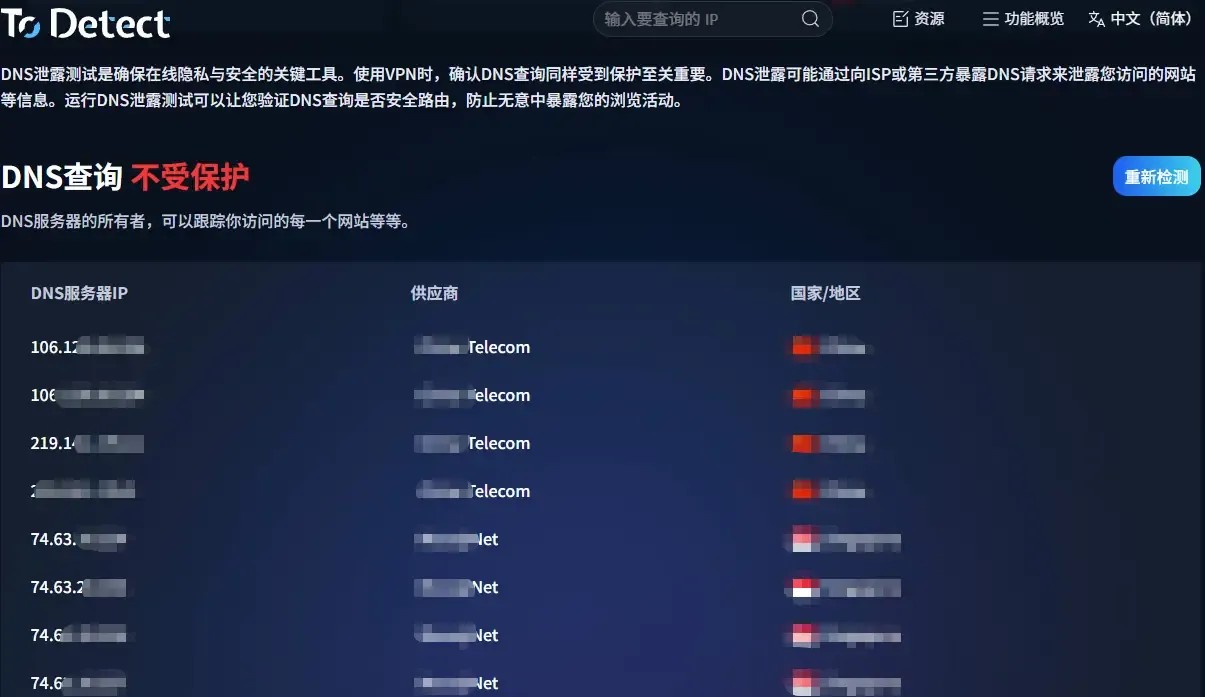
2. Before Optimizing, First Run a DNS Leak Test
Before tweaking configurations, it’s best to run a full DNS leak test. Otherwise, you won’t know where the problem lies.
Common testing methods include:
• Online DNS leak testing websites
• Browser environment detection tools
• Comprehensive privacy testing platforms
We especially recommend using a browser fingerprint detection tool like ToDetect. It not only checks DNS, but also:
• Whether WebRTC is leaking your IP
• Whether your browser fingerprint is unique
• Whether timezone and language are abnormal
• Canvas / WebGL fingerprints
Sometimes what you think is a DNS issue is actually your browser fingerprint exposing you.
3. Common Causes of DNS Leaks (Most People Have Faced These)
1. System DNS Not Changed
Many people only configure the proxy software, but the system still uses the local ISP DNS (e.g., 114 DNS or ISP DNS), causing requests to bypass the proxy.
2. Browser Built-in DNS (DoH)
Browsers like Chrome and Edge enable “Secure DNS” (DoH) by default. If not configured properly, it can actually cause DNS leaks.
3. WebRTC Leaks Real IP
This is subtle—even if DNS is fine, WebRTC may directly expose your local IP.
4. Proxy Not Set to Global Mode
Many tools default to “rule mode,” meaning some DNS requests don’t go through the proxy, leading to abnormal test results.
4. Practical DNS Leak Protection Solutions (Tested and Effective)
1. Use Reliable DNS Services (Prefer Encrypted DNS)
Recommended options:
• Cloudflare DNS (1.1.1.1)
• Google DNS (8.8.8.8)
• Quad9 (9.9.9.9)
For better protection:
• DNS over HTTPS (DoH)
• DNS over TLS (DoT)
This helps prevent DNS leaks at the source.
2. Force DNS Through Proxy
In your proxy tool, make sure:
• Enable “DNS through proxy,” use “TUN mode,” or enable “Fake IP mode” (e.g., Clash).
This is critical—otherwise even the best DNS won’t help.
3. Disable or Properly Configure Browser DoH
Two approaches are recommended: either disable the browser’s built-in DNS or set it to match your proxy’s DNS server.
Otherwise, you’ll get a mismatch where the system uses one DNS and the browser uses another.
4. Disable or Restrict WebRTC
In your browser: use extensions to disable WebRTC or turn it off in settings.
This is crucial for preventing IP leaks and is often overlooked.
5. Combine with Browser Fingerprint Protection
Many websites now check not only IP but also device characteristics. So:
• Use privacy browsers (e.g., anti-detect browsers)
• Or simulate environments using tools
We recommend using ToDetect regularly to ensure DNS is normal, fingerprints are not overly unique, and the environment is consistent.
5. Advanced: Avoid “Hidden DNS Leaks”
Some cases are more advanced—where you think everything is fine, but you’re already exposed:
1. IPv6 Leak
• If you only proxy IPv4 but your system has IPv6 enabled, leaks may occur.
👉 Solution: disable IPv6 or ensure your proxy supports IPv6
2. System DNS Cache
Operating systems may cache DNS records, leading to inaccurate test results. It’s recommended to clear the DNS cache regularly.
3. Multiple Proxy Conflicts
• IP tools + proxy software stacking
• Browser extensions + system proxy conflicts
These situations can easily cause DNS to take the wrong path.
6. DNS Leak FAQ
1. Why do DNS leaks still happen even when using an IP tool?
Many IP tools only proxy traffic but don’t fully take over DNS requests. If the system or browser still uses the local ISP DNS, a DNS leak will occur.
Additionally, if the browser has DoH enabled or WebRTC is not disabled, they may bypass the IP tool and expose real information.
2. If DNS leak tests show anomalies, does it always mean misconfiguration?
Not necessarily. Sometimes it’s due to the testing tool’s nodes or uncleared DNS cache.
However, if multiple tests consistently show DNS from a non-proxy region, it likely indicates a real DNS leak. You should check proxy mode, DNS settings, and browser configuration.
3. How to quickly prevent DNS leaks?
The most effective approach involves three steps:
• Use encrypted DNS (e.g., 1.1.1.1)
• Enable “DNS through proxy” or TUN mode in your proxy tool
• Regularly check with a fingerprint detection tool (e.g., ToDetect)
This greatly reduces the risk of DNS leaks and ensures environment consistency.
Conclusion: From Failure to Stability
DNS leaks aren’t inherently difficult—they’re just easy to overlook. Many people spend time researching IPs and nodes but ignore DNS and browser fingerprints, which are even more subtle.
If you want to avoid repeated mistakes, the best approach is to run a full check with tools like ToDetect after every environment adjustment.
Sometimes the issue isn’t a lack of skill, but a lack of information. Hopefully this guide helps you avoid common pitfalls and move from repeated failures to real success.
 AD
AD