2026 Static Residential IP Setup: Easy Guide for Regular Browsers & Anti-Detect Browsers
When managing accounts in bulk, a regular network or just any proxy IP usually won’t last very long. That’s when static residential IPs and fingerprint browsers become essential.
One is responsible for keeping your “network identity stable,” while the other isolates your “device environment.” Only when combined do they form a relatively complete anti-association solution.
However, many people still don’t know how to configure a static residential IP inside a fingerprint browser. Today, we’ll walk you through the complete setup process step by step, so you can get started immediately after reading.

1. What Is a Static Residential IP and Why Is It Important?
A static residential IP is essentially a “long-term fixed home network IP.” Unlike datacenter IPs, it behaves more like a real user’s internet environment.
Compared to dynamic IPs, static residential IPs offer several key advantages:
• Long-term IP stability with minimal changes
• Closer to a real user network environment
• Lower risk of triggering platform detection systems
• Ideal for long-term account nurturing and matrix operations
Especially for cross-border e-commerce stores, TikTok operations, and Facebook advertising accounts, stable static IP configuration is almost a basic requirement.
2. The Basic Logic Behind Static IP Configuration
In actual practice, static IP setup is usually divided into three steps:
• Obtain a static residential IP (provided by a service provider)
• Configure the proxy protocol (HTTP / SOCKS5)
• Bind and use it inside a browser or fingerprint browser
Many people get stuck on the second step, but the root issue is often simply “incorrect proxy settings” or failing to separate browser environments.
3. How to Configure a Static Residential IP in a Regular Browser
If you’re only using standard browsers like Chrome or Edge, you can configure them as follows:
1. Use System Proxy Settings
Taking Windows as an example: Open “Settings” → Go to “Network & Internet” → Find “Proxy” → Manually enter the IP address and port → Save the settings.
2. Use Browser Extensions (Recommended)
A more flexible approach is to use proxy extensions such as SwitchyOmega, then directly import SOCKS5 or HTTP proxies.
This allows you to switch between different IPs and is suitable for temporary multi-account usage.
However, regular browsers do not isolate environments, so multiple accounts logged in simultaneously can still be detected. That’s why many users eventually switch to fingerprint browsers.
4. Comparison of Different Static IP and Browser Solutions
| Solution Type | IP Stability | Environment Isolation | Complexity | Best Use Cases | Risk Level |
|---|---|---|---|---|---|
| Regular Proxy + Browser | Medium | Weak | Low | Temporary access, light browsing | Relatively High |
| Dynamic Residential IP + Regular Browser | Average | Weak | Medium | Simple registration, low-frequency tasks | Medium |
| Static Residential IP + Regular Browser | High | Medium | Medium | Long-term single-account operations | Relatively Low |
| Static Residential IP + Fingerprint Browser | Very High | Very Strong | Medium-High | Multi-account operations, cross-border e-commerce | Very Low |
| Datacenter Proxy + Fingerprint Browser | Medium | Very Strong | Medium | Bulk tasks, automation | Medium (easy to trigger detection) |
5. How to Connect a Fingerprint Browser to a Static Residential IP (Key Section)
If you are managing multiple accounts, a fingerprint browser is basically a must-have tool.
Its purpose is to generate an independent “device fingerprint” for each browser window.
This includes UserAgent, screen resolution, timezone, Canvas fingerprint, WebRTC, and more. Combined with a static residential IP, it enables a true “one account, one environment” setup.
1. Create a Browser Environment
After opening the fingerprint browser:
🔶 Create a new browser profile
🔶 Set the operating system (Windows / Mac)
🔶 Choose the browser kernel (Chrome-based)
2. Configure the Static Residential IP
Fill in the following information in the proxy settings:
🔶 Proxy type: HTTP / SOCKS5
🔶 IP address: Your static residential IP
🔶 Port: Provided by the service provider
🔶 Username and password (if required)
🔶 Then click “Check Proxy” or “Test Connection.”
If the test succeeds, your static IP setup is already halfway complete.
3. Bind an Independent Fingerprint Environment
The next critical step is setting a unique device fingerprint. It’s recommended to use one environment per account and avoid reusing the same configuration, which greatly reduces the risk of platform detection.
6. The Importance of Browser Fingerprint Detection ( ToDetect )
Many people think the process is finished after configuration, but there’s still one final step: testing.
You can use ToDetect to check whether your environment is “clean.” Detection items generally include:
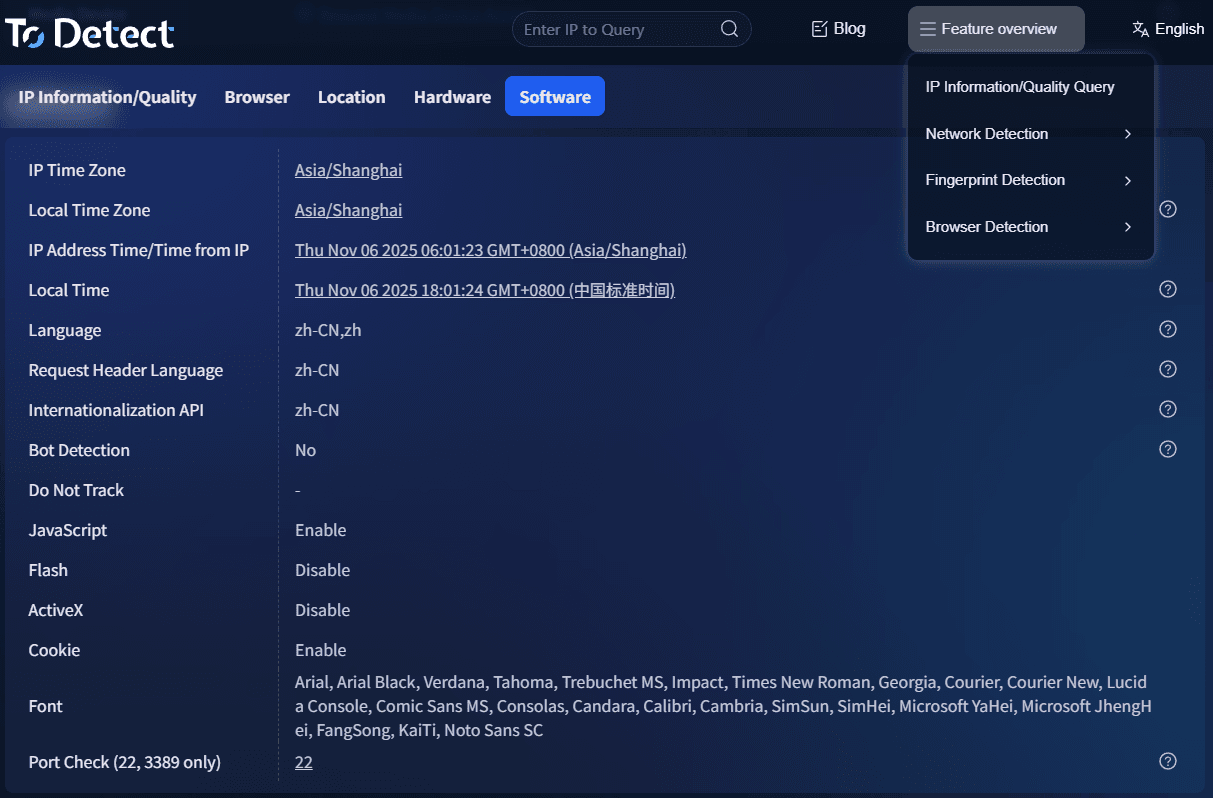
• Whether the IP geolocation matches
• Whether WebRTC leaks your real IP
• Whether the Canvas fingerprint appears abnormal
• Whether the UserAgent is consistent
If the detection results are abnormal, it means your static residential IP + fingerprint browser environment still needs optimization.
7. Static IP Configuration FAQ
1. My static residential IP is configured correctly, but my account is still being flagged. Why?
In most cases, this is not an IP issue but an “environment association” problem. For example, multiple accounts may be using the same browser fingerprint, leftover cookies, or logging in too frequently.
It’s recommended to use a fingerprint browser and ensure every account has an independent environment. Then run a browser fingerprint test with ToDetect to check for possible leaks.
2. What’s the difference between static residential IPs and regular proxy IPs? Why are static IPs recommended?
Regular proxy IPs (especially datacenter IPs) are easier for platforms to identify, while static residential IPs more closely resemble real home networks and offer higher stability.
For cross-border e-commerce or multi-account operations, the biggest advantage of static IP configuration is that it “looks more like a real user.”
3. Do fingerprint browsers always need to be paired with static residential IPs?
Strictly speaking, no—but it is highly recommended. Fingerprint browsers solve the device environment problem, while IPs represent network identity. Missing either one increases risk.
Many account issues occur because “the IP is clean but fingerprints are duplicated” or “fingerprints are isolated but the IP is unstable.”
4. If ToDetect shows everything is normal, does that mean I’m completely safe?
Not exactly. ToDetect can only help identify obvious browser fingerprint issues such as IP leaks or abnormal fingerprints.
Platform risk-control models are much more complex and also evaluate behavior patterns, login frequency, and other signals. Passing detection simply means your setup meets the basic standards—it does not guarantee 100% safety.
Conclusion
Static residential IPs solve the “network identity problem,” while fingerprint browsers solve the “device identity problem.” Combining the two creates a truly complete anti-association solution.
Combined with basic detection tools like ToDetect browser fingerprint testing, you can already avoid most low-level risk-control issues.
Of course, it’s also important to remember that no solution is “absolutely safe.” Long-term stability always comes down to: proper operations + a clean environment + avoiding overly aggressive scaling.